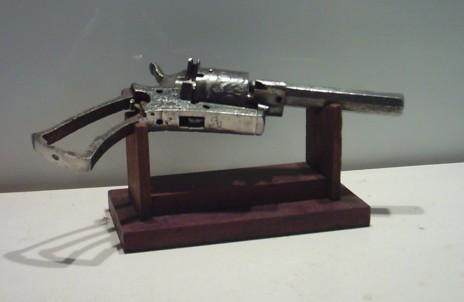
3. REVOLVER "Lefaucheux"
LIEGE-MADE LEFAUCHEUX TYPE PINFIRE REVOLVER
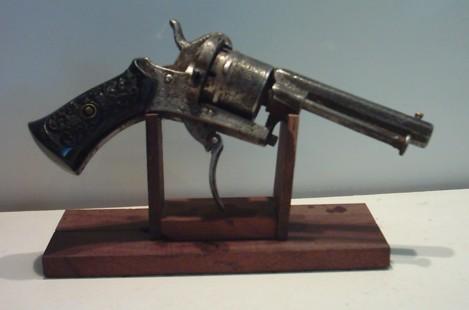
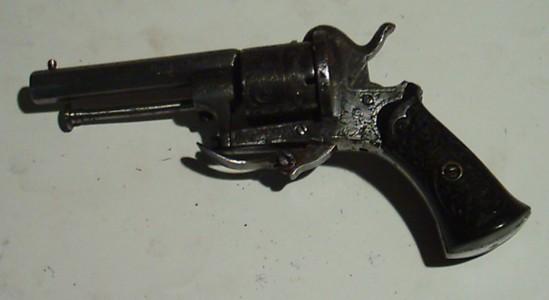
For a change, this time I am going to take care of a small pinfire revolver of mine that is in very bad condition. This is however a very interesting gun, as explained in the notes I added at the end of this chapter.
This time it will not be possible even to approach the "mint condition look"; I'll be glad if I can achieve a good refreshment of the gun.
IDENTIFICATION
- Pocket pinfire revolver, 3rd type Lefaucheux, 5 mm calibre, 6 shot, and folding trigger.
- Liège make, luxury finish, end of production era.
- Grip plates of ebony wood (not gutta-percha), machine-carved.
- Hand engravings, floral and geometrical motives on the entire gun
- No apparent maker's logo
- ELG proof mark in a crowned oval on the cylinder, controller's mark B with star and rifling proof mark crowned R on the
Right side of the chamber
- Controller's mark B with star on right side of frame, under the cylinder
- Mention "1896" handwritten with pencil on the inside of right grip plate.
- Estimated date of production: 1896 (???)


CLOSE EXAMINATION AND DAGNOSTICS
- The gun has probably been nickel or silver plated at a later date, by electrolysis and without disassembling except for the grip plates
- Plating almost totally gone
- Hammer and trigger axis welded by rust and plating
- Loading gate screw missing
- Pawl spring broken or missing
- Trigger return spring missing
- Main spring broken. The spring is also plated and is probably broken due to the electrolytic treatment.
- Light pitting here and there
The gun has obviously been nickel plated, probably at a relatively recent date. A very bad job has been done there, for the gun has not been disassembled. The plating can be seen everywhere, even on the main spring and its screw. This is highly regrettable, because that little gun was originally very well made, which is uncommon in the late production era.
Its maker has choose for the old system featuring a chain on the back of the hammer and a fork-shaped straight main spring, that make the trigger action much smoother than the later S-shaped springs do. Yet this feature was far more expensive to produce, for it required more parts and a greater elaboration.
Also the cylinder features the old fashioned locking cams in a crown around it, instead of the later rectangular notches.
Unskilled done from the start, the nickel plating has almost totally gone. However, that bad job has had at least the advantage of having more or less protected the piece against rust.
Electrolysis would be useless in this case; a smooth handwork will be required instead. A mirror polish is also out of the question, for it would damage the engravings too much. People often forget that engraved parts are never polished after having been engraved. The polishing happens prior to engraving, and the artist can not afford any error.
After the job is done, he simply rubs the design lightly with a leaden block to remove the left over scraps.
REPAIRS TO BE DONE
- Removal of rust and plating remains
- Maximum possible removal of pitting
- Polishing where possible
- Replacement of trigger returns spring
- Replacement of pawl spring
- Replacement of main spring
- Tuning
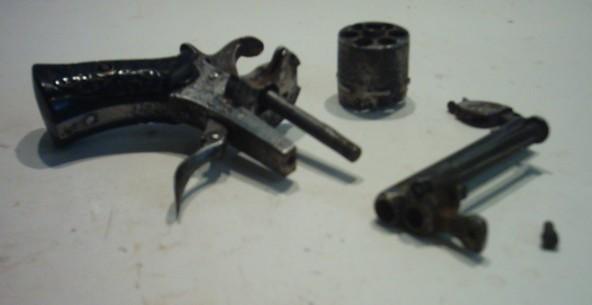
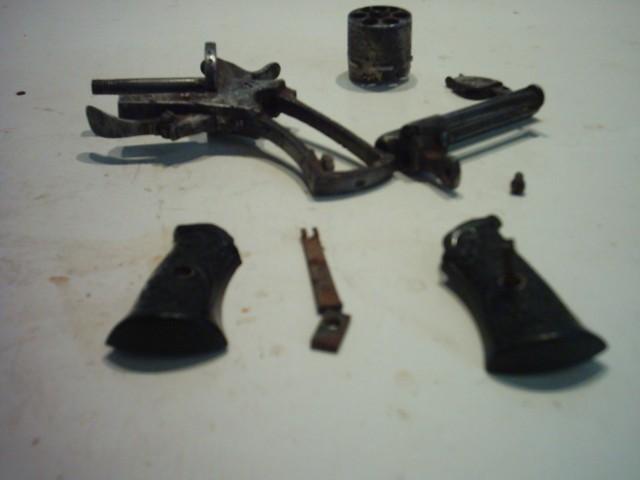
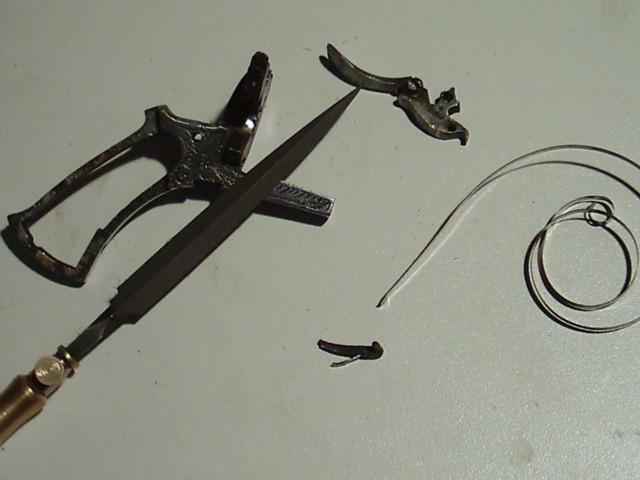
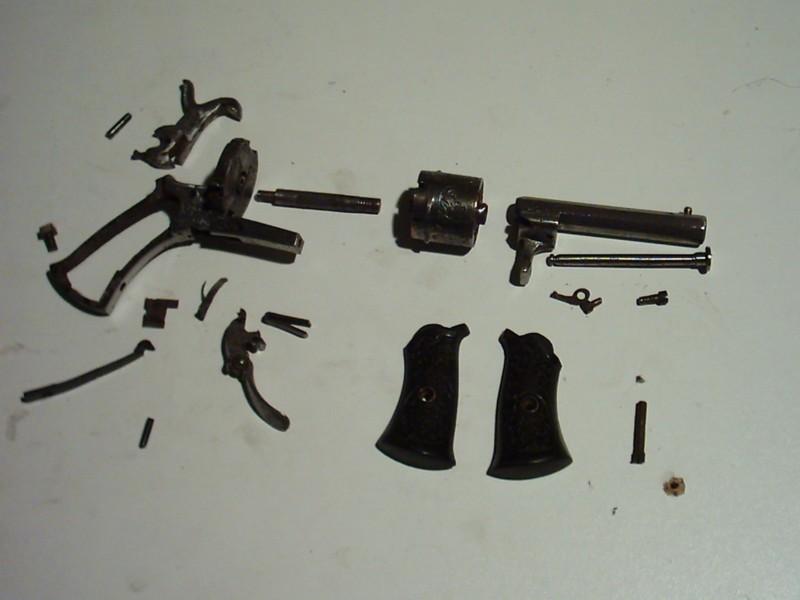
DISASSEMBLING
The barrel, the cylinder and its axis can be taken off easily, as well as the broken main spring. The hammer and trigger axles, however, refuse obstinately to come loose. So does the small screw that holds the cover plate.
The "cover plate" is a small flat part located on the frame, behind the trigger, and hold in place by a tiny screw, that can be placed centrally or at the right side of the piece. The cover plate can be found on all folding trigger revolvers. Its edges are usually cut in a dovetail so that it can shove in place from right to left. That plate is important because it limitates the trigger return movement and, on the Bulldogs, that of the rebound lever as well.
On plain trigger guns, that role is held by the rear part of the trigger guard.
The screws are obviously glued to the frame by rust and plating, and a bath in petroleum would be useless in the present case. Nor would be a heating. So I first try a light tapping with a hammer and a puncher, but without result.
The last option I have left is to drill out the screws, which of course means they will be destroyed.
I proceed the same way I did before, by marking the screw point first, then drilling carefully with a drill having a smaller diameter than that of the screw. I never drill deeper than the thickness of the frame wall, in order to avoid ripping and damaging the screw hole in the mobile part through which it passes. Then I push a puncher in the hole and I tap it gently with a hammer. The screws come loose and can be removed. Three new screws to make...
Note
*** I never drill the head of a screw, because many of those screws have a flat head that enters the frame but rest on a small ridge made into the hole. Drilling that side with a narrow drill wouldn't be of any help, because the rust that glues the screw is mostly located on that ridge. Using a thicker drill would destroy the screw head but also the ridge. Besides, the rest of the screw would still be screwed into the opposite hole, and there would be no possibility anymore to unscrew it. Therefore it is better to drill out the point, accepting the risk of damaging the threads in the frame. ***
I first remove the hammer, then the cover plate. The latter shoves relatively easy out by tapping it with the hammer grip, from left to right.
Then I can remove the trigger block and state, as I assumed, that the tiny pawl spring has gone.
I'll explain later on how to make easily a replacement one.
Did I already mention that it is highly advisable, when disassembling a gun, to have a box on hand wherein all parts can be hold, in order to avoid losing them? It is never funny to search the floor on hand and knees with a magnet to recover a lost screw, then hit one's head while standing up again and finally discover that the recovered screw in fact comes from another gun that had been worked on three weeks earlier...
DEEP CLEANING
Once the gun entirely disassembled, I decide to first clean it and reduce the pitting.
In order to avoid damaging the engravings, I use a steel wool patch drenched in petroleum or thinner (Benzene can also do).
By rubbing gently and carefully, the dirt that has accumulated in the engraving depths can be removed. Small rust stains can almost always be removed the same way provided they are first drenched with some penetrating oil that is given a few minutes to dilute them. If necessary, the job must be done again.
Also a metallic hand brush can be used, provided it is made of fine copper wire. As it is less hard than steel, the copper won't cause any damage.
Remember that electrical devices such as Dremel should not be used.
However the soft cleaning has reduced the stains and refreshed the engravings, it will obviously be impossible to make the gun look as new again.
For instance, the pitting on the barrel is too deep, so that if I attempt to remove then totally by filing, I could get through the metal. I have to respect the markings and the engravings on it as well. So I have to face it: that little gun will remain damaged for ever.
Yet I'll endeavour to make it as most presentable as possible, particularly by removing the traces of my own tools.
Note
*** I mentioned before that a piece that is pitted but clean and complete is always better than one of which the parts are alterated by to deep filing or polishing. A file removes metal, it doesn't add any.
I also said that, in order to have its maximum value, a civilian antique weapon should be in an original condition as close to new as possible.
What we have here is a small civilian gun, that has probably never been shot, but like thousands others has lost a great part of its value due to a long storage in an humid environment and a lack of maintenance. This is very regrettable, but one can always think positive and keep in mind that its actual value will be ten times higher within a century or two...***
All parts having been cleaned, I can now take the following step, which is the make of new screws and springs.
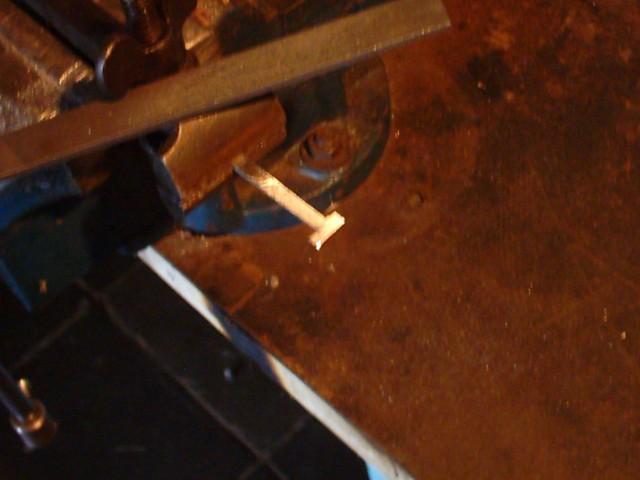
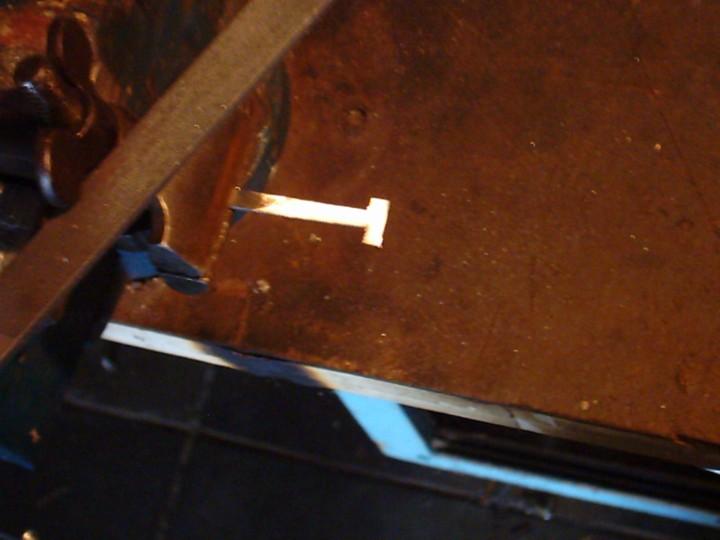
THE SCREWS
I need three of them and a pin for the loading gate as well. I explained before how I make these parts out of a nail or a piece of iron wire; it's a piece of cake. To hold the loading gate, a simple pin will do the job. Once made, it can be filed at level with the frame, so that it will be almost invisible.
As for the short small screw to the cover plate, I found a good one in my stock. On these weapons, that little screw can be of different shapes and dimensions, so that almost any screw is convenient, provided it has a flat head.
THE PAWL SPRING
This one is the easiest to make, because it only needs to be cut on the required dimensions. I have on hand a number of spiral coil springs of various calibres, coming from a lot of old clocks I bought for a penny on a junk market. Those clock springs are always of good quality and are perfect for the job.
I just need to cut a piece of approximatively 1.5 mm x 1.5 cm using heavy duty scissors. I give that piece a curve with small pincers.
No need for temper nor oil return here, the spring is thin and strong enough to be bending in shape and to do the job it is intended for: maintain the pawl in contact with the ratchet regardless of the position of the revolver.
On the contrary, placing it on the pawl itself is more delicate. Usually the spring is squeezed into a saw cut made on the bottom part of the pawl. Using a small screwdriver and tapping gently with a small hammer, I spread the cut open and remove the remains of the original spring. I have to be very careful in order to avoid breaking that part of the pawl; otherwise I’d have to make a new one.
Once my new spring put in place, I squeeze the cut with pincers to tighten it. For a better result, I usually put a drip of varnish into the cut prior to introduce the spring.
The varnish will harden and make the repair stronger, and there is no risk for it to loosen like ordinary glue could do, for instance by contact with oil.
The spring should be slightly shorter than the pawl and bent away from it. It must lend on the oblique rear part of the channel the pawl is moving in.
Its brightness may by no means exceed that of the pawl, for it would stick on the hammer or the trigger nose.
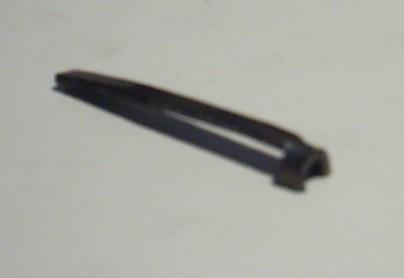
THE RETURN SPRING TO THE TRIGGER
Like in the Bulldog revolvers repaired before, the return spring is here a V shaped spring, located horizontally in a rectangular compartment cut into the frame under the cylinder. It has to meet exactly the same criteria on the field of dimensions, position and above all, its thickness. One will remember that the thickness of that spring is determinant for the proper working of the whole mechanism.
The depth of the compartment on this gun, has lead me to make a spring with a less pronounced angle than on the previous ones. The Liege- made guns of that era being all made by hand for about 80%, one will always have to make that kind of adjustments. There are no identical specimens, even when they are made in the same shop by the same maker. Parts will NEVER interchange; one must adjust or make new ones.
Once my spring made and tempered, I put it in place and test the trigger. It looks good.
THE MAIN SPRING
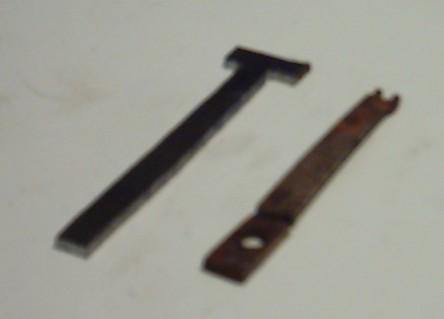
Here we've got a new element. Not a flat spring bends in a V, but a flat, lightly curved part, quite elaborated. Its thickness and brightness decrease upwards, and the head has two teeth that act like a fork. Those teeth have a special shape, made to engage the little T-shaped mobile part placed at the rear of the hammer, which is called "the chain"
The bottom part of the spring is flat with a hole drilled in the flat for the retaining screw, while the part above the flat has a lightly rounded profile. It is far more elaborated, but I still have the broken original spring that can be used as a model.
First I cut a piece of spring steel at the dimensions of the original spring, however cutting one end in a T shape. Then I heat the T lightly, so that I can bend the two wings in a right angle towards what will become the forepart of my spring (see photographs).
In the middle part of the square I have formed, and at the opposite side of the spring, I make a round cut using a thin round file.
I keep filing until I get a hole through the metal. Then I cut away the above part of the square, in order to obtain two teeth that are not in the same plan as the rest of the spring.
That being done, I just have to adjust the dimensions of the teeth, filing until they meet the original ones.
After that, I have to drill the hole for the retaining screw in the flat bottom of my spring. A whole always means weakening of a piece, so it is very important to drill it as small as possible, just large enough to enable the screw to pass through. It is also important to make sure that the flat side of the spring lays equally on the flat part in the bottom of the grip frame in order to avoid false portance which would cause the spring to break.
Now I have to thin the spring from the bottom towards the fork, very regularly, which I do using a Swiss file. I also give the forepart a rounded profile. This is not absolutely necessary, but now we are there....
Once made, I put my spring in place and give it a light curve, like the original. It fits almost immediately.
Finally, I temper it hard and make a return in oil, in the way I previously explained. To make the job more perfect, I polish the spring. It is nicer, and that was currently done in the 19th century. Sometimes springs were even engraved.
TUNING THE LOCKWORK
As always, I first assemble the mechanism and I test the single-action mode. It doesn't work, I can't pull the hammer far enough. I have to disassemble the gun again, and thin the return spring with a Swiss file. Then reassemble it all.
Now the trigger nose engages the hammer, but it is really too hard and I could break it. As I can't make the return spring thinner than it is now, because that would make it too weak, I have to correct through the hammer, by enlarging the full-cock notch with a file.
Reassembling again, and yessss, now it works well. If it had not been the case, I would have had to file the trigger nose, which is quite risky. Tuning a lockwork is not simple, it is a specialized job. Being only an amateur, I have to try and learn, and at least I am glad to know that the filings should not all be done at the same place...
Well, it's done.
I reassemble the gun, lubricate a bit, and that's it. Even if it is not perfect, my little gun can have a place in my cabinet.
MARCEL