TOOLS USED FOR RESTORATIONS
As previously said, I am not a professional, and I never learned how to use properly any specialized tooling. So I use only common tools, which can be used by anyone else.
What could I do with specific tools if I don't have the skill to use them?
So I give below a description of the tools I use for the repairs and restorations I do. These are minimum needs, and of course you can add anything you want that you would think to be of any use.
Workshop
Personally I installed my material in a corner of my garage. I have an old cupboard where I can put my material; I reinforced the upper table in order to work on it. As I have no direct daylight at this place, I use a 150 watts halogen lamp.
Various tools
- A set of good quality screwdrivers: I prefer good quality electrician’s screwdrivers. The screwdriver should fit the screw exactly, in order to avoid damaging the screws. If necessary the screwdriver head can be filed in shape. Also available are excellent screwdrivers with interchangeable heads.
- A set of good tongs and pincers of different sizes
- A good size vice, the tang of which will be equipped with leaden or leather straps in order to avoid damaging the pieces. I have even three or four different size vices, with even a small anvil on the largest one.
- A number of different shaped, good quality metal files: flat, round, convex, triangular...
- A set of screw thread drills
- A welding torch (propane), and maybe an oxhydric welding set
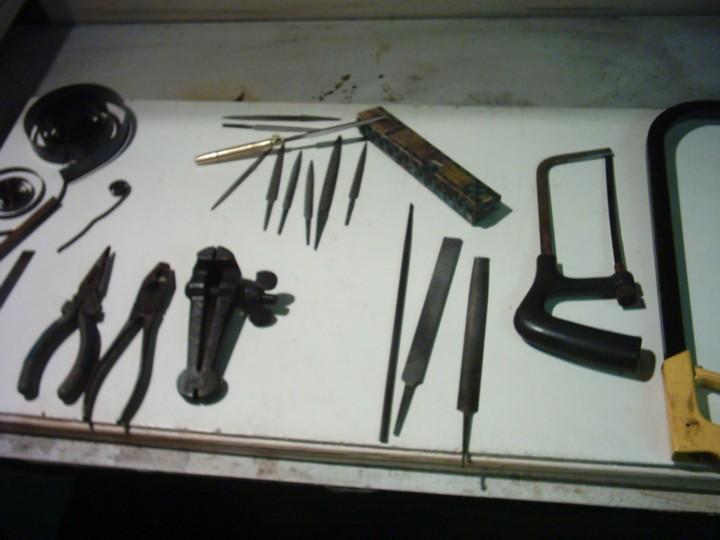
- A set of Swiss files, also know as "Geneve files" or "Bern files" (see pictures). Those little files are of excellent quality and allow for a very precise work. They are also used by clockmakers. They can be bought individually or in a set; they are not cheap, but they are worth the investment. I was lucky to find a complete set on a junk-market. I suppose they are called "Swiss files" because they are made in Switzerland and used by clockmakers.
- Some rasps and files for woodcraft (they are different from the metal ones)
- A set of different grain sandpaper sheets, from 400 to 1000. For the fine work I use that black fine grain paper they use in car paint shops. That sort can be wet with water or oil to soften its hardness.
- A small size electrical drilling machine, and a hand-operated one, together with a set of good metal and wood drills. As the small 3.5 mm and smaller ones easily break, it will be preferable to have a few spare ones on hand. Cobalt drills can drill through any kind of steel, but they are quite expensive and they can also break.
- Fine grain steel wool
- A polishing disk for metals. The ones made of different lays of cloth are better than the felt ones, because they can reach more easily all the difficult places to polish. Also a block of polishing paste will be needed.
- A set of cloth, preferably cotton
- For the polishing of wood, a block of hard wood can be needed (for instance walnut)
- A set of different wood carving chisels and a small wooden hammer
- Linseed oil, petroleum, motor oil and acid chlohydric will be needed, as well as penetrating oil, and fine lubricating oil like Legia or Ballistol.
- A few pieces of new, intemperate spring steel sticks - in a later chapter I’ll explain how to make flat and vee springs. Old used spring steel is also useful. I was lucky to find a section of the main spring of an old church clock; first quality steel, but of course it has already been tempered, so it has to be softened before it can be re-used. I'll also explain how to do this in a next chapter. Spring steel can be found in any metal retail shop. Small coil spiral springs from old clocks are very useful too, for instance to make small pawl retaining springs.
Electrolysis
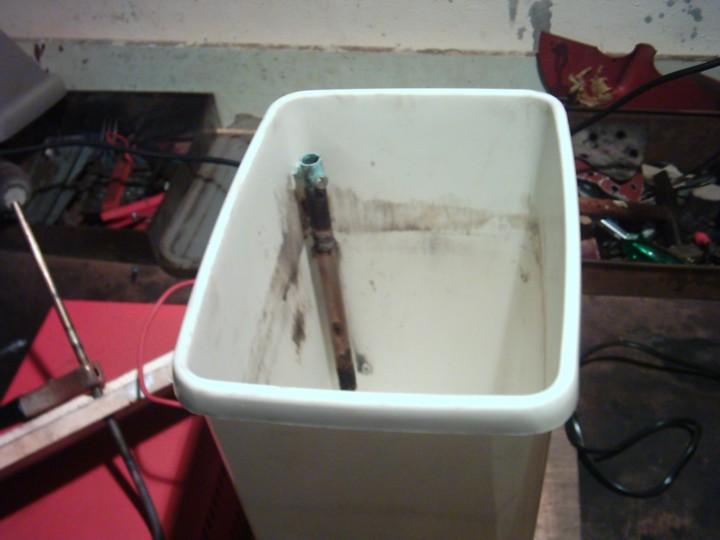
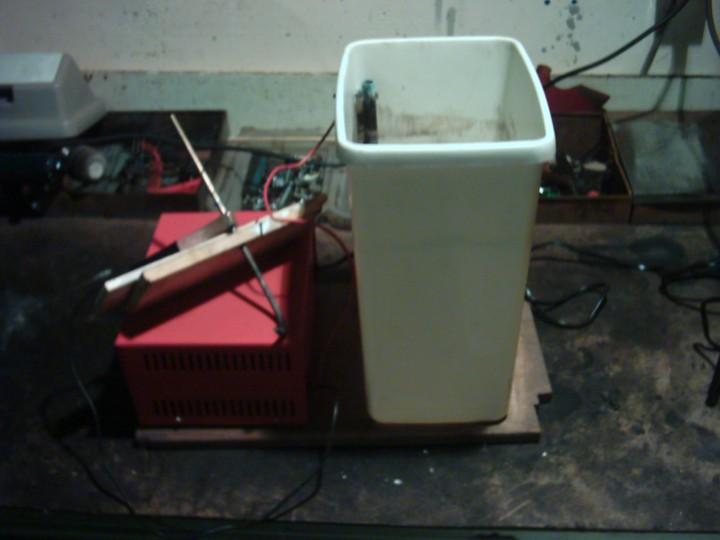
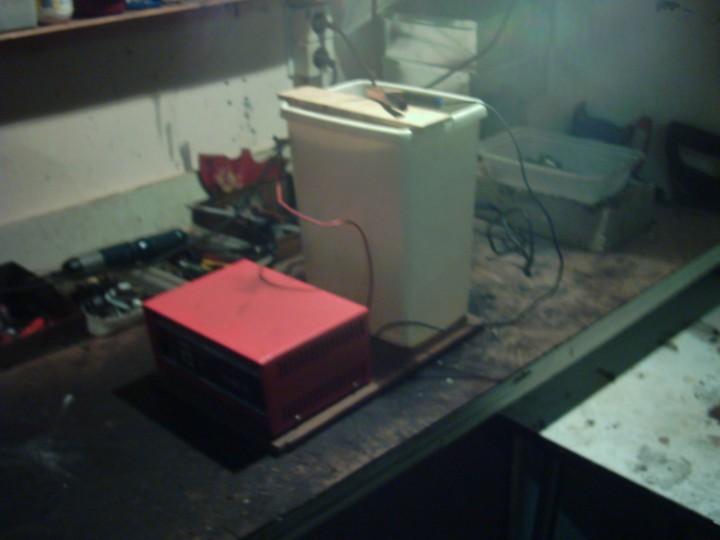
- A tub made of any non-conductible material, preferably plastic.
- A 6 or 12 volt battery charger, and an old car battery
- A piece of thick iron wire or copper pipe
- 5 litter distillates water
- Active soda
For the anode (positive electrode) in my device I attached a piece of copper pipe in a corner of the tub, with a screw that is passing through the wall, so that I can connect the + wire of the charger on it. Some people say that the anode should be in a spiral inside the tub; it may be better, but my own system works very good as well.
The actual cathode, or negative electrode, is in fact the piece that is to be de-rusted. I hang it on a copper hook in the middle of the tub, avoiding carefully any contact with the anode. I use a simple piece of wood that lies over the tub, with a hole through which the copper hook can pass. The hook is connected to the - re of the battery charger. (See pictures)
REMEMBER the springs have to be removed from the weapon, for the electrolysis makes them weak and breakable.
The actual electrolyte, or electrolysis bath, is made of 5 litter of distillate water, in which I mingle 250 gram of soda (50 gr per litter).
As the system has a tendency to get hot, which activates the security fuse on the charger and stops the reaction, I sometimes have to connect a car battery on the negative wire, as follows: negative wire of the charger to the - pole of the battery, and + pole of the battery to the cathode.
I make sure that the piece to be derusted is well immerged, and then I activate the system. The reaction starts slowly and can take from some hours to some days.
Electrolysis should be done outside or in a well ventilated place, for the gases it produces are highly explosive. The electrolytic reaction only affects the rust, not the sound metal, so there is no risk at all of "going too far". The piece can be taken out a few times during the process and cleaned with clear water in order to check the evolution. It comes out of the bath covered with a black dirty slib, which is fact softened rust, which can easily be removed. There will be slib on the bottom of the tub as well.
The procedure eliminates all the rust, but of course not the damages it caused. Holes and pitting are still there. The electrolyte can be re-used a few times after filtering.
The system is cheap and very efficient.
For healthy bank account owners, ultrasonic derusting devices are now also available.
Reblueing
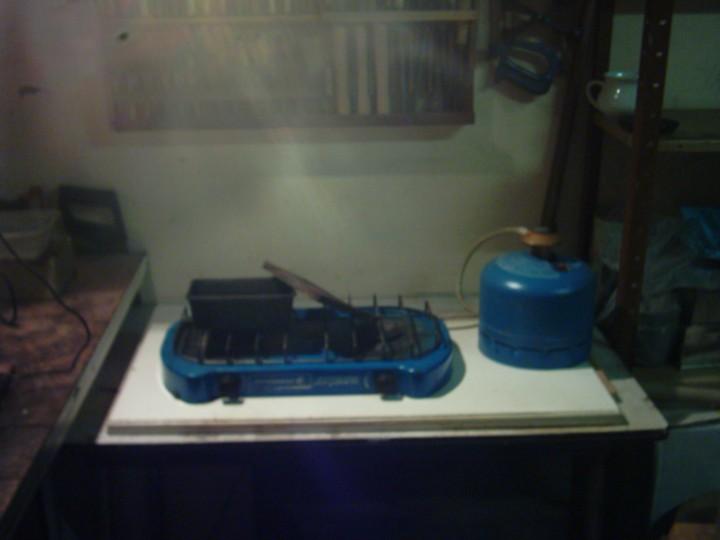
As already told, I reblue by heat.
I've got a small CampingGaz furnace, which is all I need. In order to get a homogeny heating all over the piece to reblue, I put it in a small "oven" that in my case is nothing more than an old steel bread baking form covered with a piece of iron coil. I put it on the fire for 10 minutes, and then I take them out and put them in motor oil for about 5 minutes.
They are still hot then. I wipe away the oil, and I wash the pieces carefully in hot water with detergent (dish washing soap). Then I dry them well and I do the same again twice. The results are rarely disappointing, although one should keep in mind that the colour is very much depending on the quality of the steel the weapon is made of.
If the colour appears to be too thin after the first 10 minutes, I rub the piece with graphite powder to darken it.
A variant to the oven is a bath of sand. The recipient is filled with common sand, and the piece is put into the sand and well covered. Only a small portion is left visible to check the evolution. No oil is used, and the operation takes about 30 to 45 minutes in one phase. The sand should be removed carefully afterwards.
Flame blueing
This method is sometimes applied on screws, hammers, triggers and other small pieces, rarely on a whole gun. It gives a nice deep blue colour with areas going from light blue to violet. The parts are simply placed on a piece of coil on the furnace, and heated until the "onion peel" colour appears. Then they are taken away from the fire and left on the hot coil to cool off. While cooling, the parts acquire that nice blue colour pallet. Very nice, as long as the parts have been mirror polished prior to reblueing.
I saw a few small puppy revolvers fully blued that way. It is very nice but only on small weapons.
Case-hardening
In this case it's the temper that gives changing colours on the surface of the metal, going from champagne-yellow through green to blue. The procedure needs highly toxic chemicals, and cannot be done by amateurs. I heard about new liquors that can be used by anyone now - the liquor is put on the parts and then they are heated irregularly with a torch - but I never tried that. If I need to case-harden some parts, I give them to a specialized shop (not cheap).
Well, I guess that the above described material, together with some good documentation and a little sound brain oil will allow us to achieve a lot.
Marcel